


Once you’ve learned some basic mosaic art skills, a whole new level of appreciation appears. You look at mosaic wall art and tiles differently. Rather than just admiring a beautiful piece of mosaic on display, you notice how it was put together. One key element that stands out is the use of different shapes of mosaic stones to create movement and detail. With a few simple techniques, you can also learn to cut your mosaic stone tiles into a variety of building block shapes!

Image Source : Pinterest
Tools Needed
To start creating customized tile shapes, you’ll need some tools we discussed in our recent blog about mosaic garden flower pots. These tools will work with natural stone tiles, such as the ones we feature in our Mozaico catalog.

Image Source : Pinterest
- Compound Nipper Mosaic Pliers allow you to grab the tile from the edge, without using a lot of pressure.
- Safety Glasses protect your eyes from any small flying fragments.
- Gloves can help prevent minor cuts and improve your grip on the small tiles.
- A Towel is handy to place under and around tiles while cutting. It catches any small shards that might pop loose.
Now, let’s make some shapes!
Rectangles
This shape is an easy one to try first. They’ll help you to create more impact with color in your design as well as give you thinner segments to work with. You can create multiple rectangles from one square tile – but let’s just start with two!

Image Source : Helen Miles Mosaics
Use your nippers at a 90° angle to one of the edges, as you see in the photo above. Placing the nippers in the center will create two rectangles of the same size. As you become more comfortable with your cutting skills, you can try cutting more rectangles – simply vary the spot where you place your nippers.
Smaller squares can now be created from these new rectangles. You have now been freed from the “One Tile Size Fits All” tyranny of previous mosaic art projects! By varying sizes, you can add so much more detail and life to your pieces.

Image Source : Pinterest
Triangles
These are created by cutting square tiles on the diagonal – just like cutting a sandwich. Start with a smaller square for the best results as you perfect your skills. Turn the tile with one of the points up as you work, and apply the pressure along a centerline, at a 45-degree angle.

Image Source : Mosaics Corner
Triangles are great for filling in corners and curves, as well as special effects – such as the fur on the fox below. This is also a great example of why you shouldn’t sweat it if your shapes aren’t perfect! Slightly irregular tiles are part of the appeal of mosaic art.

Image Source : Rachel Shilston
Trapezoid
Try these shapes to add a whole new dimension to your mosaic designs! They’re the base of arches, curves, waves, and all kinds of lines you see in nature. With this one in your personal repertoire of tile-cutting tricks, you’re ready to cut loose with some new images.
Use longer, rectangular stone strips to make your trapezoid tiles. First, place your trusty nippers on one of the long edges, slightly more towards one side. Then, break the tile at an angle between 45° and 90°. This ensures that the cut goes across to the long edge – while maintaining that straight line at the top/bottom.

Image Source : Mosaics Corner
Once you have a set of trapezoid tiles, you can then use them to form curved lines, as you see below. This Mozaico design completes a multiplicity of circles with an array of trapezoids! You’ll love your new ability to tighten up tile placement along the curves in your own pieces. Alternate your trapezoid shapes with squares and rectangles to make larger bends and waves.

Image Source : Mozaico Images
Circles
These are easier than you might think. Again – don’t worry about making perfectly smooth round shapes. To make circles, start with a square tile, and snip off each of the four corners. Then, keep making smaller cuts until the round shape appears.

Image Source : Mosaics Corner
It’s totally okay to cheat by tracing a lid or cap onto the piece – just to give you an idea of where you’re going with your trimming.
Rounds are great for details like eyes, flower centers, and more! This Rose Geometric mosaic art shows a circular tile at its center, as well as trapezoid shapes.
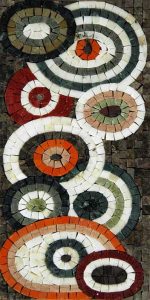
Image Source : Mozaico Images
Diamonds and Teardrops
Sounds like the name of a song – but these are also two very good shapes to add to your mosaic art skills set! They’re great for flower petal and leaves, as well as adding interest to colored borders in your mosaic wall art.

Image Source : Mosaics Corner
You won’t shed too many tears as you master this shape. Simply break your square mosaic tiles at an angle, as you did while trying the trapezoid shapes. Start trimming the point first. Once you’ve formed the tip of your teardrop, continue rounding off and shaping the other end with your nippers.
You can also make diamonds from stones – or at least the shape! Again, starting with your square stone mosaic tiles, cut away with your nippers at diagonally opposite corners. Once you’ve made the points, you can continue to use this shape – or continue to round off the edges into a more natural-looking leaf shape.

Image Source :Mosaics Corner

Image Source : Mosaics Corner
You can see how these shapes lend themselves to botanic subjects in our Blending Blooms mosaic wall art, below.

Image Source : Mozaico Images
Once you’ve mastered the basics of trimming your stone mosaic tile pieces, you’ll be more comfortable with attempting various sizes and variations. Just remember – mosaic art is a handmade craft, and its lack of perfect lines and shapes is part of the charm! Soon, you’ll be able to look at mosaic art with a more discerning eye, noticing how each piece is put together. You’re taking part in an ancient craft. Even these individual tessera from the Byzantine Era of the 6th-15th century have the touch of the original craftsman.

Image Source : Metmuseum
If you’re curious about trying out mosaic art, but aren’t sure about getting the supplies, or selecting a design – we invite you to check out our Mosaic Kits. Each “Kit-It-Up” is all-inclusive, providing everything you’ll need to create a piece of mosaic art. You can choose from over 5,000 mosaic designs! Just select a piece of artwork from our collection based on the technical skill level you feel comfortable with. It’s a fun and satisfying way to dip into the mosaic art world!