Close
Try Your Luck
With Mozaico
With Mozaico
Try Your Luck
With Mozaico
With Mozaico
Email Already Subscribed
Vous possédez un compte ?
Connectez-vous pour payer plus vite.

we ship worldwide

money back guarantee

exclusive
630.300.3942
What can we help you with?
Shipping & Taxes. FAQ.630.300.3942
What can we help you with?
How to install a mosaic.Get one-on-one expert advice from our lead designer to help you transform any area around your home or work.
Fill out the form below to submit your designer question.
Take a picture of a room in your home, a floor area or a table top that you would like to ask a question about - or simply anything you would like to make into mosaics.

If you’re reading this blog, then congratulations are in order! You’ve most likely determined that you want to install a mosaic art in your interior, and perhaps you’ve also already decided what motif or pattern you’d like your mosaic to take. This can be a lengthy process, so the fact that you’ve reached this point in the design process is worthy of at least a little celebration.
Now the next hurdle: how to install this mosaic art. You can of course turn to a professional for installation, but depending on the scale and scope of your mosaic, the cost of an expert can escalate quickly. Installing a mosaic mural yourself does not need to be daunting if you spend the time preparing and planning in advance. This blog compiles some helpful hints for the mosaic art installation process to ensure your mosaic goes up without a hitch.
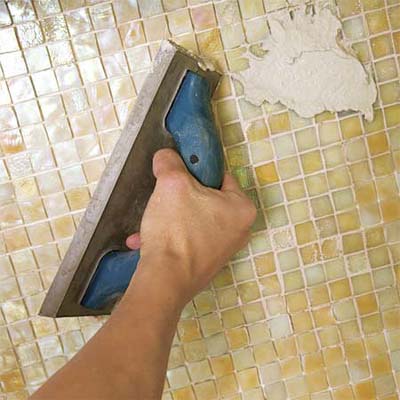
After preparing your space by protecting the surrounding areas in the room, your next decision is establishing how much mural you will complete in your work session. If you are creating a small mural or working with a preassembled mural already adhered to a mesh backing, for example, you can aim to complete the entire project in one day. For larger or more intricate installations, you might want to break your mural into component segments so that you are not overwhelmed. Once this aspect is determined, you can prepare your day’s work surface with the application of thinset adhesive or mortar with a notched trowel.
Once applied, you can begin laying out your mosaic art, ensuring that you are spacing your tiles or tesserae evenly (to aid with this, you can invest in spacers at your local hardware store). If you’re working with a preassembled mosaic that you’ve cut into pieces, you’ll want to make doubly sure that you are aligning each portion correctly. Our best advice at this stage? Work slowly. This mosaic art will hopefully be displayed in your space for quite some time, so you’ll want your workmanship to be spot-on.

Our best advice at this stage? Work slowly. This mosaic art will hopefully be displayed in your space for quite some time, so you’ll want your workmanship to be spot-on.
Once you’ve completed your day’s worth of installation, you should allow the adhesive to dry and cure overnight. Once all of your mosaic art has been installed and allowed to rest for this time, you can return to complete your project with grouting and sealing. Following a light sponging of your mosaic surface to moisten the tiles, you can apply your desired grout with a rubber float to fill in the neat spaces created between tiles. It is important that you press the grout into these grooves at a 45-degree angle to ensure that you are filling these spaces completely. Grout also takes around 24 hours to set (it varies depending on environmental factors such as humidity and temperature) but as it begins to set (and before it completely hardens), you can pass over your tiles lightly to pick up any excess grout that may have been left behind. By cleaning these gently at this stage, then you can easily wipe away any lingering remnants later one the grout has completely cured. The very final stage is to seal your mosaic’s grout, which involves the application of a final coat of sealant one your grout is completely cured.

At this point, it’s time to sit back and take in your efforts to conjure a mosaic motif within your interior. You can take pride in your dedication and your workmanship, which you can now share will all your guests!

Have an installation story to share? Whether humorous or horrific, tell us below.
Don’t Forget to Subscribe to our Newsletter for Weekly Updates on Mosaic Art, Decor, Creativity and Much More!
Ever wondered how to wall up the moister with mosaic wall art?


