Close
Try Your Luck
With Mozaico
With Mozaico

Try Your Luck
With Mozaico
With Mozaico
Email Already Subscribed

we ship worldwide

money back guarantee

exclusive
630.300.3942
What can we help you with?
Shipping & Taxes. FAQ.630.300.3942
What can we help you with?
How to install a mosaic.Get one-on-one expert advice from our lead designer to help you transform any area around your home or work.
Fill out the form below to submit your designer question.
Take a picture of a room in your home, a floor area or a table top that you would like to ask a question about - or simply anything you would like to make into mosaics.


To start making mosaic art you need four things: tesserae (the tiles), an adhesive matched to where the piece will live, tile nippers to shape the pieces, and grout. A first project costs very little and takes an afternoon plus curing time. Start small — a flower pot, a coaster, a stepping stone — because the skills that matter are identical whether the finished piece is 10 cm across or covers a wall.
It is a forgiving craft. Irregular pieces read as texture rather than mistakes, and grout hides a great deal. Nobody's first mosaic is precise, and precision is not what makes a piece look good — even grout lines are.
Most of this comes from a hardware shop or craft supplier. It is a far cheaper start than oil painting or ceramics.
| Item | What it does | Notes |
|---|---|---|
| Tile nippers | Cut and shape tesserae | Compound nipper pliers grip the tile from the edge and need very little pressure |
| Safety glasses | Protect your eyes from fragments | Not optional — chips travel further than you expect |
| Rubber or vinyl gloves | Grip, and protection from grout | Wet grout irritates some skin |
| Trowel or spatula | Mix and spread adhesive and grout | |
| Sponge | Clean grout haze off the tiles | Warm water, wrung out well |
| Pencil and paper | Sketch and transfer the design | Tracing paper for transferring outlines |
| Towel | Catches shards while cutting | Lay it under and around the work |
Workspace: level, and bigger than you think you need. You want room to lay out the whole pattern, keep tools to hand, and ideally walk around the piece to judge it from different angles. If you are working with other people, more space again.


This is the decision beginners most often get wrong, and it decides whether a piece survives outdoors. The final location determines the adhesive — always read the label for the applications it is recommended for.
| Where the piece will live | Use | Why |
|---|---|---|
| Traditional indoor work, floors, heavy pieces | Cement-based mortar | Cement, sand and water — the same family as bricklaying mortar |
| Glossy surfaces: glass, ceramic, glazed tile | Acrylic-based adhesive | Grips a surface mortar slides on |
| Outdoors, garden, anything exposed | Water-resistant adhesive | Freeze-thaw and rain destroy the wrong adhesive in one season |
| Frequently wet: splashbacks, wet rooms | Thinset mortar | Built for continuous moisture |
| Small or awkward substrates | Epoxy resin or construction adhesive | Useful where mortar is impractical |
Outdoor pieces can need up to 72 hours of curing before grouting. Follow the manufacturer's figure rather than a rule of thumb — rushing this is the most common reason a garden mosaic fails in its first winter.
Every mosaic artist you admire started the same way: sketching patterns on paper.
Draw your design at the finished size. If you are making coasters, work inside a 4″×4″ square. Working at actual size is the only reliable way to judge how many pieces you need, what size they should be, and where the grout lines will fall — and remember to leave room for grout between the pieces, because it is part of the picture, not a gap in it.
Once the drawing is right, transfer it onto the surface itself. Tracing paper is the easy way. Not every piece needs exact edges — a loose, improvised design is perfectly valid — but even a rough outline gives you a feel for tile sizes and colours before you commit.
Pick something small, flat and forgiving.
As easy as finger-painting, and genuinely an all-ages activity. Cracked or chipped pots are ideal — you are covering the damage anyway. There are three levels to work through as confidence grows: a completely impromptu, randomly applied design; a more planned version with the mosaic only around the rim; and a fully structured design where tile types and colours are chosen deliberately. If you know what you will plant in the pot, choose colours that will sit well with the flowers.
A flat surface with a lot of potential, and the natural second project. Sketch a simple round design on a paper plate first, or sit down with the paver and lay out tiles without glue to plan the arrangement.
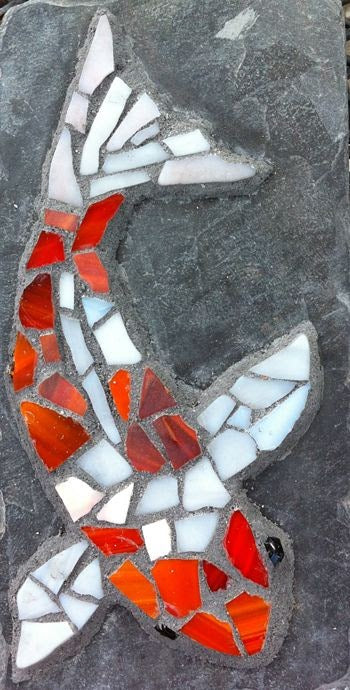
The easiest start is a single central motif — a koi fish, a flower — with no obligation to fill the whole surface. A step up is a central image with additional tiles filling the space around it. Either way the result looks good in a garden, where slight irregularity reads as handmade.
Coasters are small, quick and useful. Table tops are the natural project once cutting and grouting feel comfortable.




This is the skill that changes your work. Once you can cut deliberately, you stop filling areas with uniform squares and start following curves, modelling petals and building movement into a design. All of these use compound nipper pliers gripping the tile from the edge.
The easiest shape to start with. Place the nippers at 90° to one of the edges. Centred, you get two rectangles of equal size; vary where you place the nippers and you get more, in different proportions. You can then cut smaller squares from those rectangles. This single technique frees you from the one-tile-size-fits-all look and adds far more detail and life to a piece.
Cut a square tile on the diagonal — like cutting a sandwich. Start with a smaller square while you are learning. Turn the tile with one point upward and apply pressure along the centre line at 45°. Triangles fill corners and curves, and handle effects like fur and feathers. They are also the best illustration of why imperfect shapes do not matter: slight irregularity is part of the appeal.
The base of arches, curves, waves and most lines found in nature. Use longer rectangular strips. Place the nippers on one of the long edges, slightly off to one side, and break the tile at an angle between 45° and 90° so the cut runs across to the long edge while the top and bottom stay straight.
A set of trapezoids lets you tighten tile placement along a curve. Alternating them with squares and rectangles produces larger bends and waves.
Easier than they look. Start with a square tile and snip off all four corners, then keep making smaller cuts until the round shape appears. Tracing round a lid or bottle cap first is a perfectly good way to see where you are heading. Circles are for eyes, flower centres and dots.
Both are made the same way as the trapezoid, by breaking a square at an angle. For a teardrop, trim the point first, then round off the other end with the nippers. For a diamond, cut away at diagonally opposite corners; round the edges further and the diamond becomes a natural-looking leaf.
These two shapes are what make botanical subjects work — petals, leaves, and the interest along a coloured border.
Work in small cuts rather than trying to reach the shape in one bite. Stone breaks along its own lines, and a slightly irregular piece is almost always better than a shattered one.


Lay the pieces out dry first and do not glue anything. A trial run tells you whether everything fits and whether the surfaces are flat enough to adhere properly. It is far easier to solve a problem now than after the adhesive is down.
When you are happy, spread the adhesive smoothly across the surface and place the tiles. Then wait for it to cure — following the manufacturer's time, up to 72 hours for anything going outside. Once set, wipe away any adhesive that has squeezed up between the tiles with a sponge.
Grout fills the spaces between the tiles and turns a collection of pieces into a single surface. It comes in many colours, and the colour changes the look of a piece as much as the tiles do — black or off-white suits most designs, and black with large tile pieces is particularly striking.


Once everything is dry and set, a spray-on sealant protects the surface. It matters most for pieces that live outdoors or get wet, where unsealed grout absorbs water and stains.
Mosaic is relaxing, but it involves cut stone and powdered cement.

Progress comes in three stages, in this order: cutting accuracy, spacing, then composition.
Cutting is mechanical and improves purely with repetition. Spacing — keeping grout lines even — is what separates a beginner's piece from a finished-looking one, and it is worth more attention than most beginners give it. Composition comes last and takes longest.
A useful exercise: make the same design twice, a month apart. The difference will be in the grout lines, not the idea.
Looking closely at finished work helps more than it sounds. Once you have cut a few hundred pieces you stop seeing a mosaic as a picture and start seeing how it was built — where the maker changed tile size to carry a curve, where they let the grout do the work, where a trapezoid holds a line that a square could not.
Sourcing tesserae separately is the slowest part of a first project: finding the right colours and working out quantities takes longer than the making. A kit removes that step — Mozaico kits include tile nippers, come in over 5,000 designs, and can be made from your own photograph, sketch or drawing.


Mosaic art kits · All mosaic designs · Natural stone tiles · Custom mosaics · How to make mosaic coasters
Begin with a small flat project — a flower pot, a coaster or a stepping stone. You need tesserae, an adhesive suited to the location, tile nippers, grout, safety glasses and gloves. Sketch the design at the finished size, transfer the outline, test-fit the pieces dry, then glue, cure and grout.
Compound nipper pliers, a trowel or spatula, a sponge, rubber or vinyl gloves, safety glasses, a pencil and paper, and a towel to catch shards while cutting.
Grip the tile edge with nippers. 90° across an edge makes rectangles; a 45° diagonal makes triangles; an angled break between 45° and 90° on a rectangular strip makes trapezoids; snipping all four corners of a square and trimming repeatedly makes circles; angled breaks at opposite corners make diamonds and teardrops.
It depends on where the piece will live. Cement-based mortar for traditional indoor work, acrylic-based adhesive over glossy surfaces, water-resistant adhesive outdoors, and thinset mortar anywhere that gets wet regularly.
Up to 72 hours for outdoor pieces before grouting. Follow the manufacturer's guidance for the product you are using.
Usually around 20 minutes, then clean with a sponge and warm water. Apply all the grout in one session so the colour and joins stay consistent.
Black or off-white suits most designs. Black with large tile pieces gives a bold, graphic result; off-white is quieter and lets the tiles carry the design.
Yes, with supervision and smooth pre-cut pieces. Keep freshly nipped edges and grout powder away from small children.


8 comments
Thank you, great information
I would like to learn more about that fascinating mosaico art
I would like to learn more about that fascinating mosaico art